AI Tools 101
Skylum Luminar Neo Review: Easiest AI Photo Editing Tool?
Unite.AI is committed to rigorous editorial standards. We may receive compensation when you click on links to products we review. Please view our affiliate disclosure.

If you're a photographer or graphic designer, you probably know all too well how complicated, expensive, and frustrating editing photos can be. As someone who has spent countless hours editing and designing in Photoshop, I still can't fully wrap my head around masking, let alone keeping track of all my layers! Shouldn't editing photos be fun and effortless?
I recently came across Skylum Luminar Neo, an AI photo editing tool that claims to make the process of photo editing effortless and enjoyable. Intrigued by its promise, I decided to try it and see whether it is the easiest AI photo editing tool. Not to spoil anything too much, but I was thoroughly impressed.
In this Skylum Luminar Neo Review, I'll discuss what it is, who it's best for, and how to create an account to download Luminar Neo. From there, I will discuss all its features with examples from each category so you know everything it can do.
I will finish things off with the top Skylum alternatives I've tried so you are aware of other options to ensure you're making the best decision. By the end, you'll clearly understand whether Skylum Luminar Neo is the right AI photo editing tool for you!
Verdict
Skylum Luminar Neo is the easiest AI photo editing tool on the market at an affordable price. It offers a friendly user interface and powerful AI tools that streamline editing processes, making it a compelling option for photographers of all skill levels seeking efficiency and professional results. However, it lacks the granular control of more advanced image editing software.
Pros and Cons
- User-friendly and intuitive interface, making navigating editing tools and features easy for users of all levels.
- 30+ features and AI-powered tools with sliders simplify complex editing and deliver impressive results.
- 22+ presets for instant professional photo edits (purchase more on the Luminar Marketplace!)
- 8 Extensions for even more photo editing power, and new extensions are being introduced.
- No more complex edits like masking: Supports local adjustments and simplifies masking with Mask AI technology.
- Use it anywhere: Windows, mac OS, or as a plugin for Photoshop and Lightroom Classic.
- Lifetime one-time purchase or monthly/annual subscription options!
- 24/7 technical support and a 30-day money-back guarantee.
- Limited control over features compared to more advanced editing software on the market.
- Some AI-powered tools may not consistently deliver perfect results and require manual adjustments.
- It is not cloud-based (you must download Luminar Neo).
What is Skylum Luminar Neo?

Skylum Luminar Neo is an AI photo editing tool designed to streamline the editing process for photographers of all levels. It has an incredibly user-friendly interface, which makes navigating the editing tools and functions seamless.
Powered by artificial intelligence, Luminar Neo offers over thirty advanced editing tools and features to enhance individual images easily. From sky replacement to portrait enhancement, the Skylum software delivers impressive results with AI.
Using the Luminar AI tools couldn't be easier; select it from the toolkit in the editor and make adjustments using the sliders. It's a fun, easy, uncomplicated way to edit photos. It also comes with adjustable masking tools where you brush over select areas of your image and make edits.
If that's not enough, it comes with three generative AI tools for automatically removing and replacing elements and extending photos. There are eight extensions primarily for next-level sharpening, denoising, and more.
In this Skylum Luminar AI review, we'll dive more into these tools and features later on in the article so you can have a behind-the-scenes look!
Who is Luminar Neo Best For?
Luminar Neo is great for anyone seeking efficient, user-friendly photo editing solutions using AI. With advanced features, an intuitive interface, and robust AI tools, it's an excellent tool for streamlining photo editing and achieving impressive results!
Skylum Luminar Neo is an excellent tool for anyone interested in using AI to edit their photographs. However, it's best for beginner and professional photographers as well as real estate agents:
- Beginner photographers: The user-friendly interface and intuitive editing tools make it easy for newcomers to navigate. With over thirty AI-powered editing tools, beginners can edit and enhance images with just a few clicks; no prior editing experience is required.
- Landscape photographers: Use tools like Enhance AI to achieve perfect light and color in your landscape photos. The brightness map intelligently balances both light and color for stunning results.
- Wildlife photographers: Use Luminar's powerful extensions like Supersharp AI, Noiseless AI, Upscale AI, and Focus Stacking to get even the fine detail out of your wildlife photos.
- Portrait photographers: Take advantage of the six easy-to-use portrait tools that come with Skylum to smooth skin, deepen lip shades, slim faces, and more
- Family photographers: Use Portrait Bokeh AI to bring subjects to the foreground instantly. From there, boost colors with Enhance AI and remove unwanted objects. The opportunities are endless!
- Wedding photographers: Make the bride stand out by applying realistic bokeh with Portrait Bokeh AI. You can also whiten teeth, saturate lips, and smooth out skin!
- Newborn baby photographers: Use Face AI to instantly make skin, eyes, and mouth bright and smooth. Use Glow for more radiance and create ethereal images of newborns.
- Real estate agents: Make your listings pop by enhancing color and lighting. You can also use the HDR Merge extension to merge up to ten bracketed images for the best dynamic range.
Getting Started with Skylum Luminar Neo
In this section, I will show you how I created an account and downloaded Skylum Liminar Neo so you can also get started. I'll also show you the editing panel where all your photo editing tools are so you can see how simple the interface is!

I started by going to the Skylum homepage and selecting “Start Free Trial.” Skylum offers a 7-day free trial with no credit card required!
After creating an account, I was asked to verify my email and was taken to my account on the Skylum website. All of my Skylum apps, add-ons, discounts, and more will be stored here. The final step was downloading Luminar Neo!

Downloading Luminar Neo was simple. I went to “My software” in my Skylum account and selected “Download.”

After a few minutes, Luminar Neo successfully downloaded! Before downloading, ensure you have enough space on your computer (you'll need roughly 10 GB on your hard drive).
The Luminar Neo interface initially felt slightly overwhelming with all the different options. However, the layout was excellent, and within a few minutes, I familiarized myself with the various editing tools and features of Luminar Neo.
I appreciated that Luminar had twenty sample photos to play around with to test the different presets and tools. You can add your own RAW files to edit by selecting “Add Photos” on the left, but I selected one of the samples.

Besides the generative tools and extensions on the right, the main panels you'll want to pay attention to are the three at the top:
- Catalog: Where all your photos you've uploaded to Luminar are stored.
- Presets: Apply 22+ presets to your image.
- Edit: Access 30+ photo editing tools and features.

You'll likely spend most of your time in the Edit tab using Skylum's tools to edit your photos. Everything is clearly laid out, with Layers on the left, tools and edits on the right, and some prompts in the middle for inspiration on how to start using the different tools.
What I love about Skylum is how all the tools are categorized, color-coded, and tucked away. This made finding the right editing tools much faster and sped up the overall photo editing process.

Another one of my favorite things about Skylum is how easy it is to modify your edits in the “Edits” panel next to “Tools.” The “eyeball” icon can be turned on or off to preview the edit you applied, while the back arrow lets you reset the tool completely. This gave me complete control over the final look of my image!
Luminar Neo Key Features
Now that our account has been created and Skylum has been downloaded, it's time to dive into some of Luminar Neo's key features. I'll cover all of Skylum Luminar Neo's features, so you know what it's capable of and show you an example of each from every category.
- Favorites
- Extensions
- Essentials
- Creative
- Portrait
- Professional
- Generative Tools
1. Favorites
Two of Skylum Luminar Neo's most popular tools (or “favorites”) include Enhance AI and Sky AI:
- Enhance AI: Adjust up to twelve photo settings with intuitive sliders. Skylum uses intelligent AI algorithms to balance controls like shadows, highlights, contrast, tone, saturation, and exposure.
- Sky AI: Replace skies in photos with a single click. You can also add realistic reflections in water to match your new sky while intelligently relighting the scene. This single feature is almost reason enough to buy the entire program!
Let's look at how I was able to replace a dull, grey sky with one that is much more interesting and dynamic with a single click!
How to Use Sky AI

To start using Luminar Neo's Sky AI tool, I selected a photo from my catalog and went to “Edit.”

In the Tools on the right, I selected Sky AI, which opened different adjustment and masking tools. I selected a new sky from the Sky Selection options, instantly changing my sky!

The entire process was effortless; it only took a few clicks to transform my photo's mood and atmosphere completely. No meticulous outlining, jagged edges, or feathering is required.

From there, I played around with the adjustment and masking tools. I could fine-tune how my sky looked by adjusting the orientation, refining the mask, relighting the sky, and more.
In my case, I didn't find these adjustments to be necessary, as Luminar Neo already did a great job enhancing my sky and orientation. However, these adjustment tools are a great addition for photographers who want more editing control.
2. Extensions

Luminar Neo also supports many extensions to expand your editing capabilities even further! These include:
- Supersharp AI: Enhances the sharpness and clarity of your images with advanced artificial intelligence algorithms.
- Focus Stacking: Combines multiple images with different focal points to create a final image with maximum depth of field.
- Background Removal AI: Effortlessly remove the background with AI.
- Upscale AI: Enhance the resolution and quality of your images without losing detail or introducing artifacts.
- Noiseless AI: Eliminates noise and grain from your photos for a clean and professional look.
- HDR Merge: Combine multiple exposures to create stunning High Dynamic Range (HDR) images.
- Magic Light AI: Adds sparkle to the lights in your images to create a magical and ethereal atmosphere.
- Panorama Stitching: Create sweeping panoramic images by seamlessly stitching together multiple photos.
Let's see how Supersharp AI does!
How to Use Supersharp AI

I started by selecting a blurry photo from my Catalog and going to “Edit.”

Next, I went to the tools on the right and selected “Supersharp AI” from the Extensions. I kept everything at default and selected “Low.” I wanted to see how much the low setting would sharpen my photo.
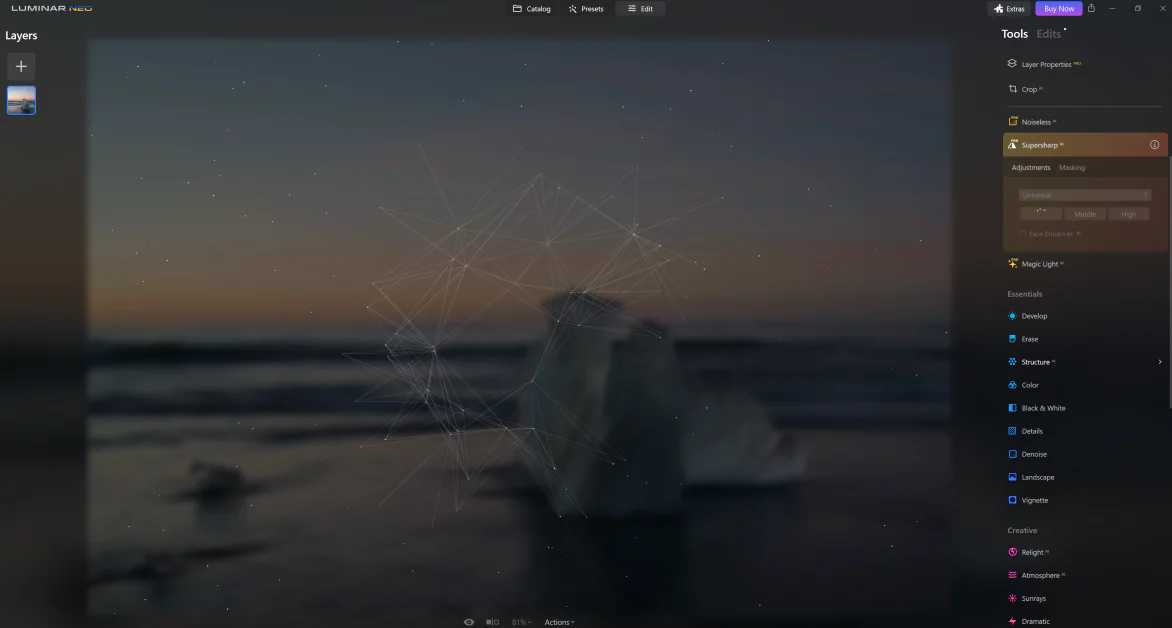
With a single click, Skylum started automatically sharpening my photo using advanced artificial intelligence algorithms to analyze and sharpen the details.
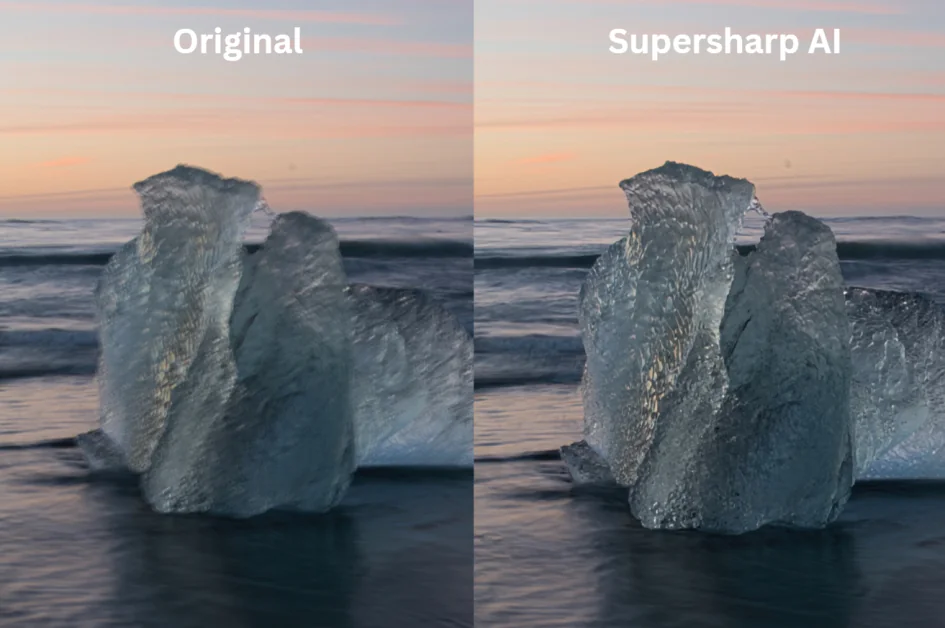
Supersharp AI is a fast and efficient way to instantly enhance my images' sharpness instantly. I could transform my blurry photo into a sharper, more professional-looking image with a single click. The low setting worked perfectly for my needs, but the medium and high options are great for even more sharpening power.
3. Essentials
Skylum Luminar Neo also has a suite of essential photo editing tools for basic adjustments and enhancements:
- Develop: Make precise adjustments to photos acting as a “digital darkroom.” With it, you can optimize exposure, color, tone, and more for the desired look and feel.
- Erase: Remove unwanted details with a few clicks. Apply a red overlay mask and cover the areas you want to remove. Click “Erase,” and it's done!
- Structure AI: Naturally enhances image details and textures using advanced algorithms. It selectively sharpens, adds detail, and enhances clarity, including edges and textures.
- Color: Add adjustments and vibrance, and remove the color cast with the toggles.
- Black & White: Instantly convert an image to black and white and control the luminance and saturation of each color channel for complete control.
- Details: Enhances and brings out crystal-clear sharpness with no halos or artifacts.
- Denoise: Remove image noise caused by high ISO settings, underexposure, or long shutter speeds.
- Landscape: Improve the quality of landscape photos by controlling the haze, golden hour, and foliage hue. This is great for real estate, travel, and nature photos.
- Vignette: Darken or lighten the edges of your image while keeping the center untouched. You'll also have the flexibility to position the center point anywhere in the picture.
Let's see how I used Structure AI to enhance the sharpness and detail of my photo!
How to Use Structure AI

I wanted to emphasize and enhance the rocky landscape and night sky textures in my photo. I selected my image from the catalog and went to the “Edit” tab.
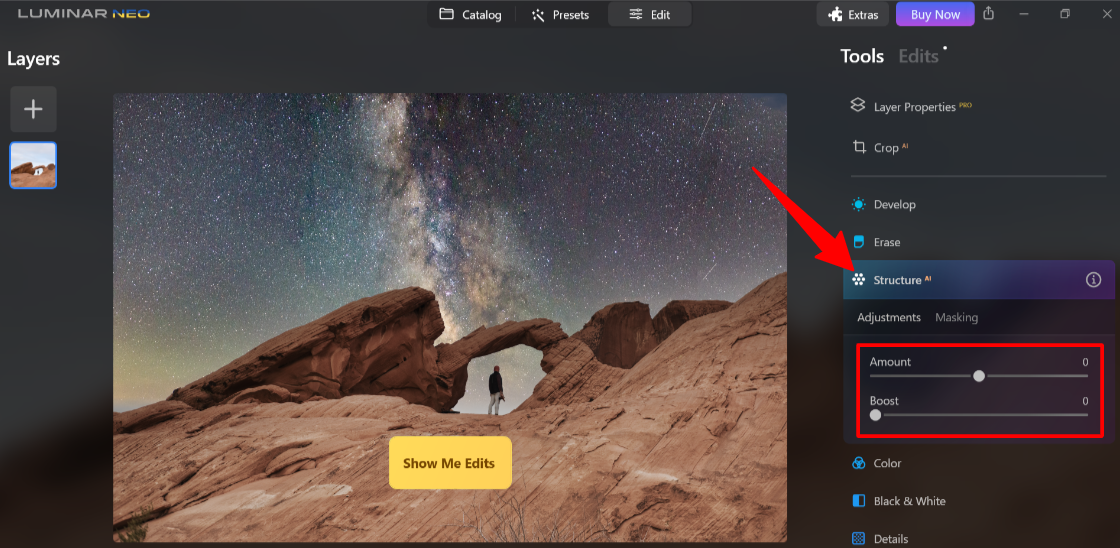
From there, I selected “Structure AI” from the tools and adjusted the Amount and Boost toggles to enhance the sharpness and detail of my photo.
Here are my results!

By slightly adjusting the toggles found in the Structure AI tool, I could reveal the intricate details of the rocky landscape and night sky in my photo.
The Structure AI feature in Luminar Neo truly elevated the overall quality of the image without making it look over-processed or unnatural. Once again, the process was simple and fun without being overly complicated!
4. Creative
Skylum Luminar Neo doesn't stop at basic photo editing tools. It also comes with various creative features to further enhance your images:
- Relight AI: Get complete control over the lighting in a photo. This tool is ideal for enhancing an image creatively and resolving technical issues with backlit photos.
- Atmosphere AI: Add fog, mist, or haze to images while preserving a realistic look and ensuring the subject of your photograph is not covered by the effect.
- Sunrays: Control the position, warmth, and glow for a subtle or dramatic lighting change. You can then blend it with other modes for added control.
- Dramatic: Add a gritty cinematic effect to photos that mimic the bleach bypass darkroom technique. This is great for stylized fashion shoots, urban images, and grungy athletic portraits.
- Mood: Enhance your photo's appearance with professional lookup tables (LUTs). Choose from film stocks and black-and-white looks, or create custom color grades in seconds.
- Toning: Adjusts the overall brightness and contrast for a balanced image. This is a crucial tool for getting tonal harmony.
- Matte: Create a vintage appearance by using muted colors and strong contrast. This is great for altering the mood of both landscape and portrait images.
- Neon & Glow: Add artistic brilliance using an easy-to-use photo editing tool that infuses vibrant colors and captivating radiance.
- Mystical: Enhance your image by softening the luminescence, increasing contrast and saturation. It adds a dreamy and fantasy look with a creative glow in the lighter areas of the picture.
- Glow: Produce a lighting impact to enhance bright elements like streetlights or the sky in your image.
- Blur: The Blur tool offers Gaussian, Motion, and Twisted styles. Using masking, adjust the intensity, angle, position, and target specific areas. It's excellent for fixing issues or adding creative effects.
- Film Grain: Add random, stylized grain to your photos that emulates analog film stock. This gives your color or black-and-white images an analog feel.
Let's see how I was able to
How to Use Atmosphere AI

I started by selecting an image from the catalog where I wanted to apply some atmospheric effects and went to “Edit.”

From there, I selected Atmosphere AI and selected “Mist” from the dropdown since that's the effect I wanted to apply. The other options were fog, layered fog, or haze. Next, I adjusted the amount of mist, the depth, and the lightness.
Here's how it turned out!

There isn't a massive difference between the two, but if you look closely (particularly at the grass), you will see slightly more haze/mist in the second photo.
5. Portrait
Skylum Luminar Neo also offers tools specific to portrait photography. These include:
- Studio light replicates authentic studio lights.
- Portrait bokeh creates a dreamy background blur, highlighting your subject regardless of the camera or lens.
- Face AI naturally enhances facial features that are bright and smooth.
- Skin AI gives models natural skin texture effortlessly without meticulous retouching tools.
- Body AI lets you realistically adjust the size of a model's abdomen with sliding toggles.
- High key applies high key lighting to overexpose the subject slightly.
I'll show you how to use Face AI to enhance the facial features in your portrait naturally!
How to Use Face AI

To use Skylum Lumiar Neo's Face AI tool, I started by selecting a photo from my catalog with a model and going to “Edit.”

Next, I selected “Face AI” from the tools to open the face, eyes, and mouth and zoomed into the model's face. I adjusted the face light using the toggles and slightly slimmed the model's face!

It's a fast and easy way to bring out the best features in your portrait subjects. The Face AI tool in Skylum Luminar Neo simplifies enhancing facial features without the need for complex retouching techniques!
6. Professional
Skylum Luminar Neo also comes with some professional photo editing tools:
- Supercontrast: Get precise tonal contrast adjustment using six separate controls for highlights, mid-tones, and shadows.
- Color Harmony: Adjust the brilliance and warmth of the colors in your photos.
- Dodge & Burn: Precisely lighten or darken the tone in your images to simulate traditional darkroom techniques. This is great for adjusting light on specific areas.
- Clone: Replaces unwanted or damaged pixels. Select a source and paint those pixels on other areas of your image to cover dust spots and damage. There's also feathering for seamless blending.
Let's see how I used Supercontrast to bring out the tones of a picture of a waterfall.
How to Use Supercontrast

I started by selecting a photo from the catalog and went to “Edit.”
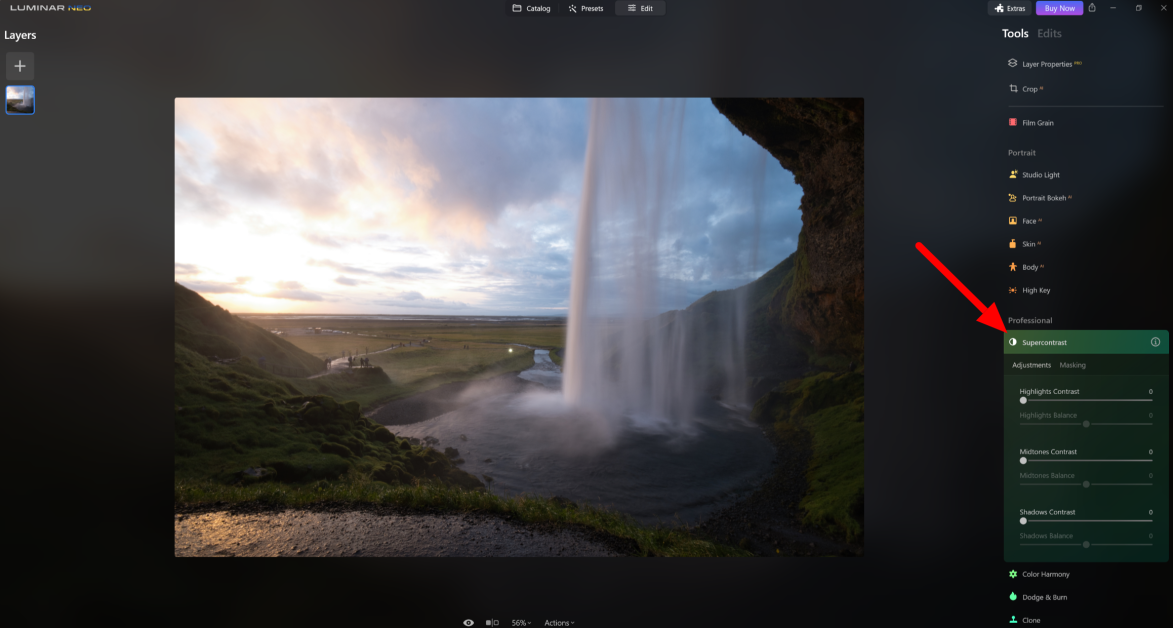
From there, I selected “Supercontrast” under the Professional section and adjusted the highlights, midtones, and shadow toggles. Here's how it came out!

By simply adjusting the different toggles, I was able to bring out the blues and oranges in the clouds and enhance the contrast between the light and dark areas of the waterfall. The result was a more vibrant and impactful image.
7. Generative Tools
Skylum Luminar Neo also has three generative tools that are worth mentioning:
- GenErase: GenErase allows you to seamlessly remove powerlines and unwanted objects or people from your photos. This erase tool removes distractions and creates a clean, clutter-free composition with just a few clicks!
- GenSwap: GenSwap replaces elements in your photos with AI-generated visuals that integrate with the rest of the image.
- GenExpand: GenExpand uses AI to extend the sky, enlarge landscapes, or add more elements to your photos.
Each generative tool functions similarly. I'll show you how I used GenErase!
How to Use GenErase

To start using GenErase, I selected my photo from the Catalog and clicked “GenErase” under “Generative Tools” on the right.

This immediately opened GenErase. I was impressed by how simple the interface was! All of my tools were laid out on the bottom.

I adjusted the brush size and highlighted what I wanted to erase in the photo. When I was ready, I hit the “Erase” button.

Skylum did a good job removing and replacing the iceberg with a wave from the original image, and it only took a few seconds! I was happy with how natural the wave looked, as if it had always been there. Using GenErase to transform my photo was effortless.
With GenErase, I no longer need to spend hours meticulously editing out distractions or using complex cloning techniques. Select the object you want to remove, and GenErase will do the rest.
Top 3 Alternatives to Skylum Luminar Neo
While Luminar Neo offers many features and capabilities, it's always good to explore alternative photo editing software to find the one that suits your editing needs most. Here are three top alternatives to Luminar Neo you should consider:
Photoleap by Lightricks

Photoleap by Lightricks is an all-in-one photo editor for creating fantastic photo edits directly on your phone! With over thirty million downloads, it's the ultimate photo editing app with many user-friendly tools to make cuts, remove backgrounds, and more. You can add a personal touch by adding filters, effects, fonts, and stickers!
Photoleap and Skylum Luminar Neo are excellent, user-friendly photo editing platforms with AI capabilities. However, the most significant difference is that Photoleap is a mobile app with more creative editing features and a library of assets you can play around with. Meanwhile, Skylum is exclusively available on desktop and more geared towards beginner and professional photographers who want to streamline their professional edits using AI.
If you take most of your photos on your phone and want creative fun editing them using AI, go for Photoleap. For streamlining your professional photo edits using AI, I highly recommend Skylum Luminar Neo!
Read our Photoleap Review or visit Photoleap.
Adobe Photoshop

Adobe Photoshop is widely considered the industry standard for professional photo editing software so that you won't overlook it. Adobe constantly updates its applications and has recently introduced cutting-edge AI tools like Firefly.
Photoshop and Skylum offer incredible AI features for photo editing, such as removing and replacing content or expanding the borders of images in seconds. However, the most significant difference is that Photoshop is more complex but offers more advanced features. Skylum, conversely, is more user-friendly but is packed with all the essential photo editing tools you'll need. Photoshop also tends to be slightly more expensive.
If you're a beginner interested in making professional edits to your photos using AI tools on a simpler interface, I'd recommend going with Sklyum Luminar Neo. For cutting-edge AI photo editing tools with more features and flexibility to edit your photos exactly how you want them, choose Photoshop.
For the best of both worlds, get both! Skylum Luminar Neo works incredibly well as a standalone application or an Adobe Photoshop plugin. You can't go wrong with either; Photoshop and Skylum offer continuous updates and improvements to ensure users access the latest features and tools.
Topaz Photo AI

Topaz Photo AI by Topaz Labs is an AI-powered photo editing platform offering advanced features and image enhancement tools. It specializes in noise reduction to significantly reduce image noise without sacrificing detail or image quality.
Besides noise reduction, Topaz Photo AI sharpens, upscales, fixes light problems, and removes distractions. The best part is you only have to pay for it once!
While both Topaz Photo AI and Skylum Luminar Neo offer excellent AI photo editing solutions, Skylum Luminar Neo provides a more comprehensive suite of AI photo editing tools to enhance photos, replace skies, and more. Skylum also offers sharpening and noise-reduction tools like Structure AI, but they don't specialize in noise reduction as Topaz Photos does.
If you're looking for the best AI photo editor to sharpen and denoise your images, I recommend Topaz Photo AI. For a user-friendly interface with a more comprehensive suite of AI tools for professional photo editing, choose Skylum Luninar Neo!
Skylum Review: Is It the Easiest AI Photo Editing Tool?
After using Skylum Luminar Neo extensively to edit my photos, I can confidently say that it's the easiest photo editing tool on the market. The AI tools speed up the process, and the sliders make photo editing easy and fun. The interface is well laid out, with categorized and color-coded tools for easy navigation.
From my experience, Skylum Luminar AI strikes the perfect balance between user-friendly editing and professional-level results. Whether you're a beginner or a seasoned photographer, you'll find the intuitive controls and automated AI features of Luminar Neo to be a game-changer in your editing workflow.
Ultimately, Skylum is the more affordable, user-friendly alternative to Adobe Photoshop. However, if you're an avid Adobe user, you can use Skylum Luminar Neo as a plugin with your existing Adobe Lightroom and Photoshop applications for the best of both worlds.
I hope you found my Skylum Luminar review helpful! Whether an aspiring photographer or a seasoned professional, Skylum offers comprehensive AI tools to bring professional photo edits to life. Why not give it a try and unlock the full potential of your photos?
Click Here to visit Skylum Luminar Neo
Frequently Asked Questions
Is Skylum Neo worth it?
Yes, Skylum Luminar Neo is worth it. It's the more affordable, user-friendly Adobe Photoshop alternative and a great way to use powerful artificial intelligence tools to enhance photos. However, professional photographers may want to use Adobe Photoshop for more robust tools, features, and control over photo edits.
Is Luminar Neo better than Lightroom?
Luminar Neo is better than Lightroom because it offers a more user-friendly interface and simplified sliders than Lightroom, aiming to streamline photo editing for beginners without extensive tutorials or learning curves.
What is the difference between Luminar Skylum and Neo?
Luminar Neo is distinguished by its modular engine, making updates easier and more frequent by Skylum. This ensures that Neo always has the latest and best features and can accommodate Extensions to enhance the existing tools.
Do professionals use Luminar?
Yes, Luminar is widely used by professional photographers. It's the perfect balance between offering robust AI features with a user-friendly interface. Its wide range of editing tools caters to all types of professional photographers, whether you shoot landscapes, wildlife, weddings, newborns, etc. Plus, it integrates with other professional image editing software like Adobe Photoshop and Lightroom for versatility.
Is Luminar Neo as good as Photoshop?
Yes, Luminar Neo is as good as Photoshop. It offers easy-to-use AI image editing tools for professional photo editing. However, they differ because Luminar Neo is more user-friendly, and Photoshop has more robust tools and features for more advanced, precise photo editing. You can't go wrong with either; the choice between the two depends on your needs, skills, and budget!
What are the disadvantages of Luminar?
Some of the disadvantages of Luminar include the lack of advanced editing features compared to other software. Despite being compatible with Windows and macOS devices, Luminar Neo is not cloud-based. You must download the software, which takes roughly 10 GB of storage space.
Is Skylum Luminar a one-time purchase?
Skylum Luminar offers the flexibility of a one-time purchase and a subscription model! With the one-time payment, you'll receive one perpetual license that is yours forever. They also offer 1-month, 12-month, or 24-month subscriptions!
What does Skylum Luminar do?
Skylum Luminar is an AI-powered photo editing tool that offers a wide range of features, including color grading, sky replacement, and portrait enhancement. It also comes with over 22 presets (plus more that you can buy from the Luminar Marketplace) to edit photos easily and quickly. It can be used as a standalone application or a plugin for popular photo editors like Adobe Photoshop.