Logo:
Logo:  Areas Served:
 From Development to Deployment of an AI Model Using Azure
Last Updated on April 7, 2024 by Editorial Team
Author(s): Prashant Kalepu
Originally published on Towards AI.
Hey there, fellow learners! U+1F44B Welcome to another exciting journey in the realm of machine learning. Today, we’re going to discuss about the often overlooked but incredibly crucial aspect of Building ML models, i.e, Deploying machine learning models. So grab your favorite beverage, get cozy, and let’s embark on this enlightening adventure together!
Why learning to deploy the ML model is important?
Now, you might be wondering, “Why bother with deploying a frontend for my machine learning model?” Well, my friend, let me tell you — it’s all about taking your projects from the confines of your code editor to the real world. Sure, you’ve spent countless hours crafting the perfect model, fine-tuning those hyperparameters, and achieving impressive accuracy scores. But what good is all that if your masterpiece remains hidden away, inaccessible to the masses?
Deploying your machine learning models with a frontend opens up a world of possibilities. It allows you to share your creations with others, showcase your skills to potential employers, and even contribute to solving real-world problems. Plus, let’s not forget the satisfaction that comes from seeing your hard work in action and making a tangible impact on the world around you.
Let’s Get Started: Building and Deploying Your Model
Now that we’ve established the importance of deployment, let’s roll up our sleeves and dive into the nitty-gritty details. Here’s a step-by-step guide to help you navigate the process like a pro:
Step 1: Building Your Machine Learning Model
Before we can deploy our model, we need something to deploy, right? So let’s start by building our machine learning model. And for this task I am going to use the Telco Customer Churn Dataset from Kaggle. This involves several key steps, starting with data collection and preprocessing.
Data Collection and Preprocessing
The first step in building any machine learning model is to gather and preprocess your data. This often involves dealing with missing values, handling categorical variables, and scaling numerical features. Let’s take a closer look at how we can accomplish this:
import pandas as pd
import matplotlib.pyplot as plt
import math
from sklearn.metrics import mutual_info_score
from sklearn.preprocessing import OneHotEncoder,LabelEncoder,MinMaxScaler
import numpy as np
from sklearn.model_selection import train_test_split
from keras.layers import Dense
from keras.models import Sequential
from sklearn.metrics import classification_report
df=pd.read_csv('..\Kaggle Competitions\Customer Churn Prediction\WA_Fn-UseC_-Telco-Customer-Churn.csv')
df.head()
Exploratory Data Analysis (EDA) and Data Cleaning
Once we have gathered our data and preprocessed it, the next step is to conduct exploratory data analysis (EDA) to gain insights and identify patterns in the data. This involves visualizing the data and analyzing key statistics. Let’s delve into it:
for i in df.columns:
 print(f"{i} Unique values:- {df[f'{i}'].unique()}")
df.isnull().sum()
df['TotalCharges']=pd.to_numeric(df['TotalCharges'], errors='coerce')
df.dropna(inplace=True)
df.drop(columns=['customerID'],inplace=True,axis=1)
df['PaymentMethod']=df['PaymentMethod'].apply(lambda x: str(x).replace(' (automatic)',''))
churn_count=df['Churn'].value_counts(normalize=True)
churn_count.plot(kind='bar',color=['springgreen','salmon'])
plt.title('Churn Distribution over dataset')
Feature Engineering
Feature engineering involves creating new features or transforming existing ones to improve model performance. This can include encoding categorical variables, creating interaction terms, or scaling numerical features. Let’s engineer some features:
one_hot_encoded_data = one_hot_encoded_data[['tenure','TotalCharges','MonthlyCharges','Churn']]
one_hot_encoded_data.head()
mxs=MinMaxScaler()
one_hot_encoded_data['tenure']=mxs.fit_transform(np.array(one_hot_encoded_data['tenure']).reshape(-1,1))
one_hot_encoded_data['TotalCharges']=mxs.fit_transform(np.array(one_hot_encoded_data['TotalCharges']).reshape(-1,1))
one_hot_encoded_data['MonthlyCharges']=mxs.fit_transform(np.array(one_hot_encoded_data['MonthlyCharges']).reshape(-1,1))

lb=LabelEncoder()
one_hot_encoded_data['Churn']=lb.fit_transform(np.array(one_hot_encoded_data['Churn']).reshape(-1,1))
Model Selection
Once our data is cleaned and features are engineered, we can move on to selecting a suitable machine-learning model for our problem. The choice of model depends on the nature of the problem (classification or regression), the size of the dataset, and the interpretability of the model. Let’s choose a model:
model=Sequential()
model.add(Dense(4,activation='relu',input_dim=16,kernel_initializer='uniform'))
model.add(Dense(4,activation='relu',kernel_initializer='uniform'))
model.add(Dense(1,activation='sigmoid',kernel_initializer='uniform'))

model.compile('adam',loss='binary_crossentropy',metrics=['accuracy'])
x=one_hot_encoded_data.drop(['Churn'],axis=1)
y=one_hot_encoded_data['Churn']
x=np.array(x)
y=np.array(y)
x_train,x_test,y_train,y_test=train_test_split(x,y,test_size=0.2,random_state=10)
model.fit(x_train,y_train,epochs=100,validation_split=0.1,batch_size=12)
Model Training and Evaluation
With our model selected, it’s time to train it on our prepared data and evaluate its performance. This involves splitting the data into training and testing sets, fitting the model to the training data, and evaluating its performance on the testing data. Let’s train and evaluate the model:
y_pred=model.predict(x_test)
y_pred=(y_pred>0.5)
1 in y_pred
print(classification_report(y_test,y_pred))
And finally, save your model so that you can use it for deployment
model.save("model.h5")
From now on, each step is crucial to the success of your project, so be sure to pay close attention to detail as you progress.
Step 2: Creating Your Flask Web App
With our model trained and ready to go, it’s time to take the next leap and deploy it with a frontend. Before we delve into deploying our model, let’s briefly discuss web frameworks. Web frameworks provide a structure and set of tools to streamline the process of building web applications. Some popular web frameworks in Python include Flask, Django, and Streamlit. While Django is a full-featured framework with many built-in functionalities, Streamlit is specifically designed for data science and machine learning applications. Today, we’ll focus on Flask due to its simplicity and versatility, making it suitable for a wide range of use cases.
We’ll be using Flask, a lightweight web framework for Python, to accomplish this. Here’s how:
Setting Up Your Flask App
Initializing a Flask application is straightforward. We’ll define routes to handle different functionalities of our web app. Let’s set up the basic structure:
from flask import Flask, render_template, request
from keras.models import load_model
import numpy as np

app = Flask(__name__)

# Home route
@app.route('/')
def home():
 return render_template('index.html')

if __name__ == '__main__':
 app.run(debug=True)
Integrating Your Model
Load your trained machine learning model into the Flask app and define the main prediction route.
app = Flask(__name__)

# Load the trained model
model = load_model("model.h5")

# Home route
@app.route('/')
def home():
 return render_template('index.html')

# Prediction route
@app.route('/predict', methods=['POST'])
def predict():
 # Get user inputs from form
 inputs = [float(x) for x in request.form.values()]

 # Perform prediction
 prediction = model.predict(np.array([inputs]))
 churn_status = "Churn" if prediction > 0.5 else "No Churn"

 return render_template('result.html', churn_status=churn_status)

if __name__ == '__main__':
 app.run(debug=True)
This code sets up a Flask web app with two routes:
- ‘/’ route for the home page where users can input their data.
- ‘/predict’ route to handle the prediction logic and display the result.
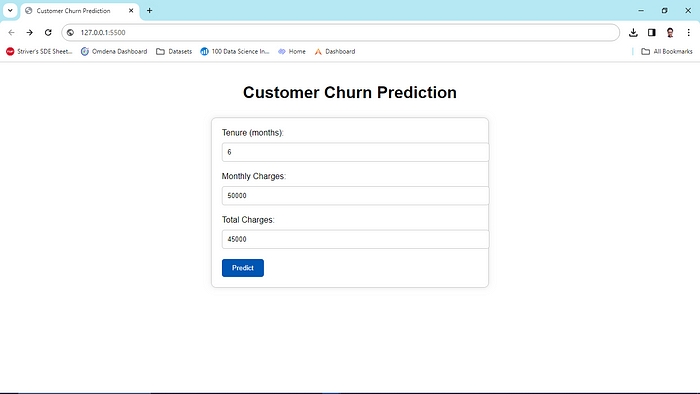
Creating a Frontend
Now that we have our Flask app set up, let’s build a simple front-end interface using HTML and CSS to interact with our model. We’ll have two HTML templates: index.html for the input form and result.html to display the prediction result.
HTML code for index.html
<!DOCTYPE html>
<html lang="en">
<head>
 <meta charset="UTF-8">
 <meta name="viewport" content="width=device-width, initial-scale=1.0">
 <title>Customer Churn Prediction</title>
 <style>
 body {
 font-family: Arial, sans-serif;
 margin: 0;
 padding: 20px;
 }
 h1 {
 text-align: center;
 margin-bottom: 30px;
 }
 form {
 max-width: 500px;
 margin: 0 auto;
 border: 1px solid #ccc;
 padding: 20px;
 border-radius: 10px;
 box-shadow: 0 0 10px rgba(0,0,0,0.1);
 }
 label {
 display: block;
 margin-bottom: 10px;
 }
 input[type="number"] {
 width: 100%;
 padding: 10px;
 margin-bottom: 20px;
 border: 1px solid #ccc;
 border-radius: 5px;
 }
 input[type="submit"] {
 background-color: #007bff;
 color: #fff;
 border: none;
 padding: 10px 20px;
 border-radius: 5px;
 cursor: pointer;
 }
 input[type="submit"]:hover {
 background-color: #0056b3;
 }
 </style>
</head>
<body>
 <h1>Customer Churn Prediction</h1>
 <form action="/predict" method="post">
 <label for="tenure">Tenure (months):</label>
 <input type="number" id="tenure" name="tenure" required>
 <label for="MonthlyCharges">Monthly Charges:</label>
 <input type="number" id="MonthlyCharges" name="MonthlyCharges" required>
 <label for="TotalCharges">Total Charges:</label>
 <input type="number" id="TotalCharges" name="TotalCharges" required>
 <input type="submit" value="Predict">
 </form>
</body>
</html>
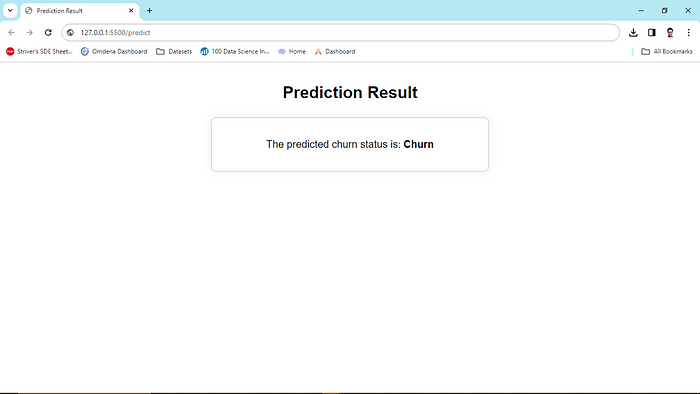
HTML code for result.html
<!DOCTYPE html>
<html lang="en">
<head>
 <meta charset="UTF-8">
 <meta name="viewport" content="width=device-width, initial-scale=1.0">
 <title>Prediction Result</title>
 <style>
 body {
 font-family: Arial, sans-serif;
 margin: 0;
 padding: 20px;
 }
 h1 {
 text-align: center;
 margin-bottom: 30px;
 }
 .result {
 max-width: 500px;
 margin: 0 auto;
 border: 1px solid #ccc;
 padding: 20px;
 border-radius: 10px;
 box-shadow: 0 0 10px rgba(0,0,0,0.1);
 }
 .result p {
 text-align: center;
 font-size: 20px;
 }
 </style>
</head>
<body>
 <h1>Prediction Result</h1>
 <div class="result">
 <p>The predicted churn status is: <strong>{{ churn_status }}</strong></p>
 </div>
</body>
</html>
Testing Locally
Before deploying our Flask app, it’s essential to test it locally to ensure everything is working as expected. Open a terminal, navigate to the directory containing your Flask app, and run the following command:
python app.py
By following these steps, you’ll have a fully functional Flask web app ready to make predictions with your machine-learning model.
Step 3: Deploying on Azure
Now that we have our Flask web app up and running locally, it’s time to share it with the world. And what better way to do that than with Azure App Service? Here’s how to deploy your Flask app on Azure using VS Code:
Create web app on Azure Web App Service
Certainly! Below is a step-by-step process of creating a web app on Azure Web App Service:
- Open your web browser and navigate to the (https://portal.azure.com/).
- Sign in with your Azure account credentials.
- In the Azure Portal, click on the “+ Create a resource” button in the upper-left corner.
- Search for “Web App Service” in the search bar and select “Web App” from the search results.
- Click on the “Create” button to begin creating a new Web App.
- Provide the following information in the “Basics” tab like subscription, resource group, name of the app, etc.
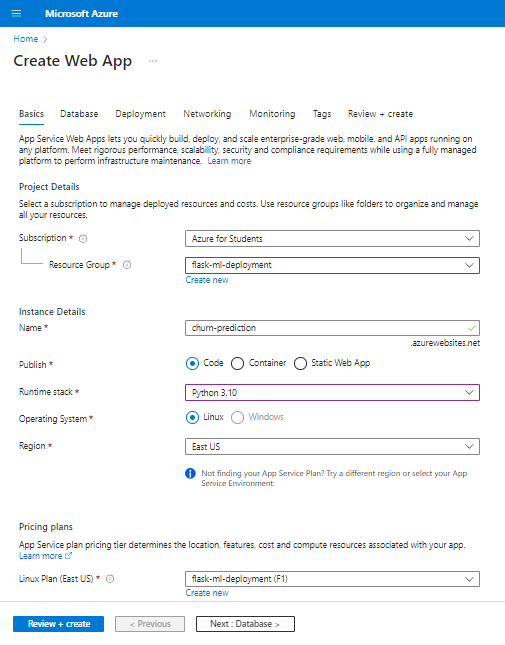
7. Click on the “Review + create” button to proceed to the next step.
8. Review all configurations for your Web App and click on “Create” button to create your web app.
9. Wait for the deployment to complete. You can monitor the progress of the deployment in the Azure Portal.
10. Once the deployment is complete, open your project on VS Code.
Deploy the app from VS Code
1. In VS Code, install “Azure Tools” from the extensions section.
2. After that, you will be able to see a new icon “Azure”.
3. In the Azure tab, find the Web app that you just created on your Azure account from “App Service” section.
4. Then right-click on the Web app and click on “Deploy to Web app”.
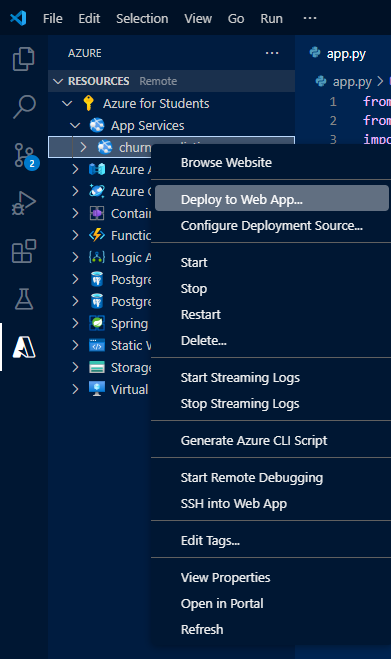
5. Select the project from the panel and wait till the deployment is complete. You can see the progress of Deployment in the terminal.
6. Once the app is deployed, you will be able to open it.
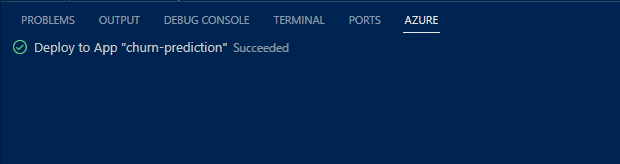
And just like that, you’ve successfully deployed your machine-learning model with a front for the world to see!
Conclusion
And there you have it, folks! We’ve covered the ins and outs of deploying your machine learning models with a frontend, from building your model to deploying it on the Azure platform. I hope this journey has been as enlightening for you as it has been for me.
Remember, the world of machine learning is vast and ever-evolving, so don’t be afraid to experiment, learn from your mistakes, and keep pushing the boundaries of what’s possible. Who knows? Your next project could be the one that revolutionizes the field!
Until next time, happy coding, and may your models always deploy flawlessly. Cheers! U+1F680
Join thousands of data leaders on the AI newsletter. Join over 80,000 subscribers and keep up to date with the latest developments in AI. From research to projects and ideas. If you are building an AI startup, an AI-related product, or a service, we invite you to consider becoming a sponsor.
Published via Towards AI
Related posts
Popular posts

 for 2021")


Updates

Recent Posts