

Real-time transcription allows you to transcribe audio as it is generated, rather than submitting a complete audio file for transcription as with asynchronous transcription. Using real-time transcription you can build features like automated subtitles for live speeches, presentations, etc.
In this tutorial, we will learn how to perform real-time transcription in Python using only 15 lines of code.
You can find all of the code for this tutorial in this repository.
Getting started
For this tutorial, we’ll be using AssemblyAI’s real-time transcription model. You’ll need an API key, so get one for free here if you don’t already have one. You’ll have to set up billing in order to use real-time transcription. If you want to test out the API for free, consider following some of our other tutorials on asynchronous transcription.
Setting up the virtual environment
We’ll use the AssemblyAI Python SDK for this tutorial, which makes it easy to interact with the AssemblyAI API. To install it, first create a directory and virtual environment for this project by executing the below commands in a terminal:
mkdir real-time-transcription && cd real-time-transcription
python -m venv venv
Next, activate the virtual environment. On MacOS/Linux, enter the following command:
source ./venv/bin/activateOn Windows, enter this command:
.\venv\Scripts\activate.batWe’ll need the system dependency portaudio before installing the necessary pip packages, so install it with apt install portaudio19-dev (Debian/Ubuntu) or brew install portaudio (MacOS). For other operating systems, see the portaudio website.
Now, simply install the SDK and the additional extras we’ll need with the below command:
pip install "assemblyai[extras]"The extras contain additional packages to add functionality we’ll need for real-time transcription, like getting the audio stream from the microphone.
Setting up the environment file
The AssemblyAI Python SDK requires your API key to be stored in an environment variable called ASSEMBLYAI_API_KEY. We’ll use python-dotenv to load this environment variable for our project. In order to do so, we’ll need to store the environment variable in a file that the package can read. In your project directory, create a file called .env and paste your API key as the value for the environment variable:
ASSEMBLYAI_API_KEY=your-key-hereNote, it is extremely important to not share this file or check it into source control. Anybody who has access to these keys can use your respective accounts, so it is a good idea to create a .gitignore file to make sure that this does not accidentally happen. Additionally, we can exclude the virtual environment from source control. The .gitignor file should therefore contain the following lines:
.env
venv
How to perform real-time transcription in Python
To perform real-time transcription, we open a WebSocket with the AssemblyAI servers. A WebSocket is a protocol that keeps a communication channel between a client and server alive, which allows for the server to push data to the client without an explicit request. This ability and the relatively low overhead of WebSockets make them perfectly suitable for real-time data transfer.
While the details of establishing a WebSocket with AssemblyAI’s servers is abstracted away by the SDK, we still need to add event handlers which define how our application will handle the data being sent to us over the WebSocket.
Data handler
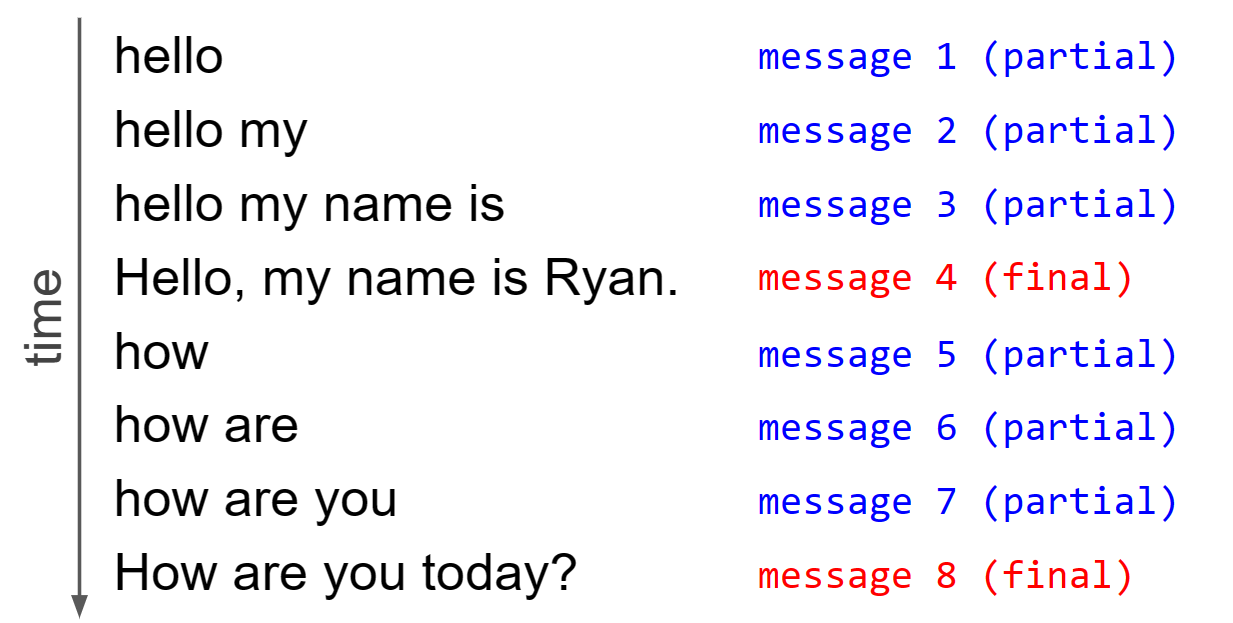
First, we define how to handle incoming data. This handler is called when a new RealtimeTranscript has been received. To understand how we should write this handler, we must first understand how AssemblyAI’s real-time transcription service sends messages during a real-time transcription.
Every message that AssemblyAI’s server sends is one of two types - either a partial transcript, or a final transcript. Partial transcripts are sent in real-time when someone is speaking, gradually building up the transcript of what is being uttered. Each time a partial transcript is sent, the entire partial transcript for that utterance is sent, and not just the new words that have been spoken since the last partial transcript was sent.
When the real-time model detects that an utterance is complete, the entire utterance is sent one final time (formatted and punctuated by default) as a final transcript rather than partial. Once this final transcript is sent, we start this process over with a blank slate for the next utterance.
This process can be visualized in the below diagram for two utterances:
So, to handle an incoming message we first check to see if it is a final transcript or not. If it is a final transcript, we print out the transcript and go to a new line for the next utterance. Otherwise, it is a partial transcript and we again print out the transcript, but this time we specify a carriage return at the end of the print statement.
The carriage return brings the cursor back to the beginning of the line and means that the next incoming transcript will overwrite the current line. Since each partial transcript contains all previous words in the utterance, this has the effect of seeming to just print the delta (i.e. the new words) since the last message.
Create a file called main.py and define the following function inside it:
def on_data(transcript: aai.RealtimeTranscript):
  if isinstance(transcript, aai.RealtimeFinalTranscript):
    print(transcript.text, end="\r\n")
  else:
    print(transcript.text, end="\r")
Finally, we handle the case in which the transcript object received contains no text, meaning that there is nothing being spoken in the audio stream at that time. In this case, there is no speech transcribed and therefore nothing to display, so we simply return.
def on_data(transcript: aai.RealtimeTranscript):
  if not transcript.text:
    return

  if isinstance(transcript, aai.RealtimeFinalTranscript):
    print(transcript.text, end="\r\n")
  else:
    print(transcript.text, end="\r")
Error handler
Next, we write another handler that determines what to do if we receive an error. For simplicity, we will just print the error:
def on_error(error: aai.RealtimeError):
  print("An error occured:", error)
Create and run the transcriber
Now we’re ready to write our main script code. First, instantiate a RealtimeTranscriber object, passing in our two handlers as well as the sample rate for the audio stream:
transcriber = aai.RealtimeTranscriber(
  on_data=on_data,
  on_error=on_error,
  sample_rate=44_100,
)
Next, we open the WebSocket by using this object’s connect method:
transcriber.connect()Now, we open a microphone stream to stream the audio from our microphone to the application, and then pass it into the stream method of our transcriber
microphone_stream = aai.extras.MicrophoneStream()
transcriber.stream(microphone_stream)
Finally, after we are done transcribing, we close the WebSocket connection to clean up all loose ends before exiting the script.
transcriber.close()Running the script
Back in the terminal, with your virtual environment activated, run the script with
python main.py # you may need to instead use `python3`If you start speaking, you will see your words transcribed in real time. When you finish an utterance, you will see it formatted and punctuated. If you begin speaking again, the process will repeat with the new utterance on a new line. To close the WebSocket, press ctrl + c.
Bonus - open and closing handlers
Above, we defined the on_data and on_error handlers for our WebSocket. In addition, we can also define handlers that are called when the WebSocket is opened and closed. In your main.py file, try adding the following functions:
def on_open(session_opened: aai.RealtimeSessionOpened):
  print("Session ID:", session_opened.session_id)

def on_close():
  print("Closing Session")
And then add to your transcriber definition to pass these handlers in:
transcriber = aai.RealtimeTranscriber(
  on_data=on_data,
  on_error=on_error,
  sample_rate=44_100,
  on_open=on_open,
  on_close=on_close,
)
Now, if you run the script again, you will see the session ID printed when the WebSocket is opened, and the closing message printed when the WebSocket is closed.
Final words
In this tutorial, we learned how to perform real-time transcription in Python using only about 15 lines of code. We saw how the AssemblyAI Python SDK makes it easy to open WebSockets in order to perform real-time transcription using AssemblyAI’s Speech Recognition model.
For further reading on AI, check out some of our other content like How ChatGPT Actually Works or An Introduction to Poisson Flow Generative Models. Alternatively, feel free to follow us on Twitter to stay in the loop when we release new content.


