Logo:
Logo:  Areas Served:
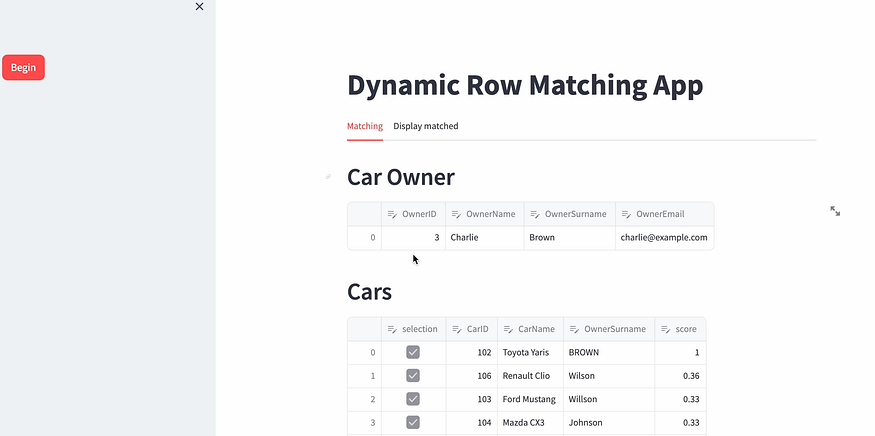
Unlocking the Power of Session State in Streamlit (2/2)
Last Updated on November 5, 2023 by Editorial Team
Author(s): Stavros Theocharis
Originally published on Towards AI.
Introduction
In my previous related article, we saw what Streamlit’s session state is and how it can be used in practice with a simple example. Streamlit can be really used for nice apps, and someone can easily develop such apps with only a few lines of code. I think that in the beginning it was considered to be more for creating prototypes, but as time passes, I believe that it can be used for more production apps in general. When it comes to proprietary tools made by organizations for their in-house work, design isn’t as important. Instead, the usefulness and overall value they provide are more important. That’s why I believe Streamlit will be one of the packages for building internal tools in organizations in the near future.
Creating a Dynamic Row Matching App for Two Dataframes
So, as I promised, let’s see a nice example. In my opinion, this is a real-world example, as many of us sometimes want to match rows from one dataframe with rows from another dataframe. Of course there are specific requirements, and the statement “matching” is a bit blurry. In this example, we do not care about the matching functionality, but mainly we care about the UI functionality with Streamlit.
Let’s make this example more concrete!
Mock data creation
We have a dataset with Car owner information and a dataset with Cars information. In the Cars dataset, we have only the name of the owner. So, we need an app that, based on the name of the Cars dataset, will propose Car owners, and then the user will be able to validate whether this matches or not and make the appropriate adjustments.
Let’s create these two datasets using pandas dataframes:
import pandas as pd

# Sample data for Car Owners
owners_data = {
 'OwnerID': [1, 2, 3, 4, 5],
 'OwnerName': ['Alice', 'Bob', 'Charlie', 'David', 'Eve'],
 'OwnerSurname': ['Smith', 'Johnson', 'Brown', 'Davis', 'Wilson'],
 'OwnerEmail': ['[email protected]', '[email protected]', '[email protected]', '[email protected]', '[email protected]']
}

# Sample data for Cars
cars_data = {
 'CarID': [101, 102, 103, 104, 105],
 'CarName': ['Honda Civic', 'Toyota Camry', 'Ford Mustang', 'Chevrolet Malibu', 'Nissan Altima'],
 'OwnerName': ['Alice', 'Charlie', 'Eve', 'Bob', 'Eve'],
 'OwnerSurname': ['Smith', 'Brown', 'Wilson', 'Johnson', 'Wilson'] # OwnerSurname based on the Car's owner
}
So, the created dataframes can be shown below:
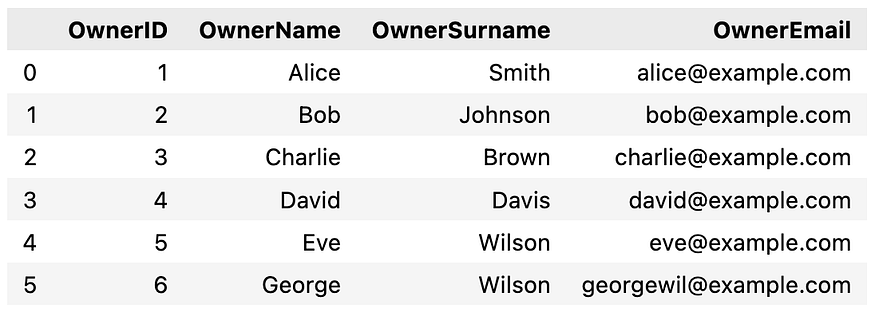
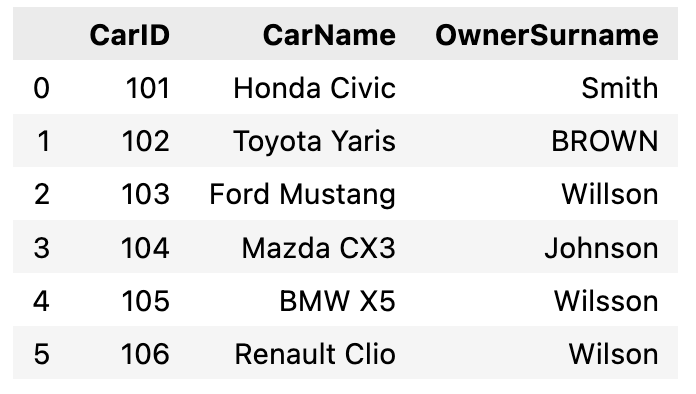
As we can see, there are some typos in the Cars dataframe, or uppercase and lowercase characters. This is a common situation with real-world data when information is gathered manually. I can say that the data in these two dataframes is good (in reality, more problems exist!).
Matching algorithm
So the logic is simple: If we have a match based on a score applied to the ‘OwnerSurname’ column, we need to match them through the IDs. After that, we need to display these matches in our app and let the user choose based on the proposals made by the algorithm (this is often called “human in the loop”).
Let’s create a simple matching function. We will use the rapidfuzz library, which is a fast string matching library for Python and C++, which is using the string similarity calculations from FuzzyWuzzy.
Through the below function, we get a score on the similarity between two strings.
from rapidfuzz import fuzz

def calculate_distance_ratio(text_1, text_2):
 try:
 text_1 = text_1.upper()
 text_2 = text_2.upper()
 return round(fuzz.QRatio(text_1, text_2) / 100, 2)
 except:
 return 0
Ok, now the compare part between the rows of the dataframes. I know this is not efficient when applied to many rows, but it is just an example:
final_df = pd.DataFrame()
for idx1, row1 in car_owners_df.iterrows():
 for idx2, row2 in cars_df.iterrows():
 score = calculate_distance_ratio(row1["OwnerSurname"], row2["OwnerSurname"])
 temp_row = pd.DataFrame(row1).T
 temp_row["score"] = score
 temp_row["CarID"] = row2["CarID"]
 final_df = pd.concat([final_df, temp_row], axis=0)
 final_df = final_df.reset_index(drop=True)
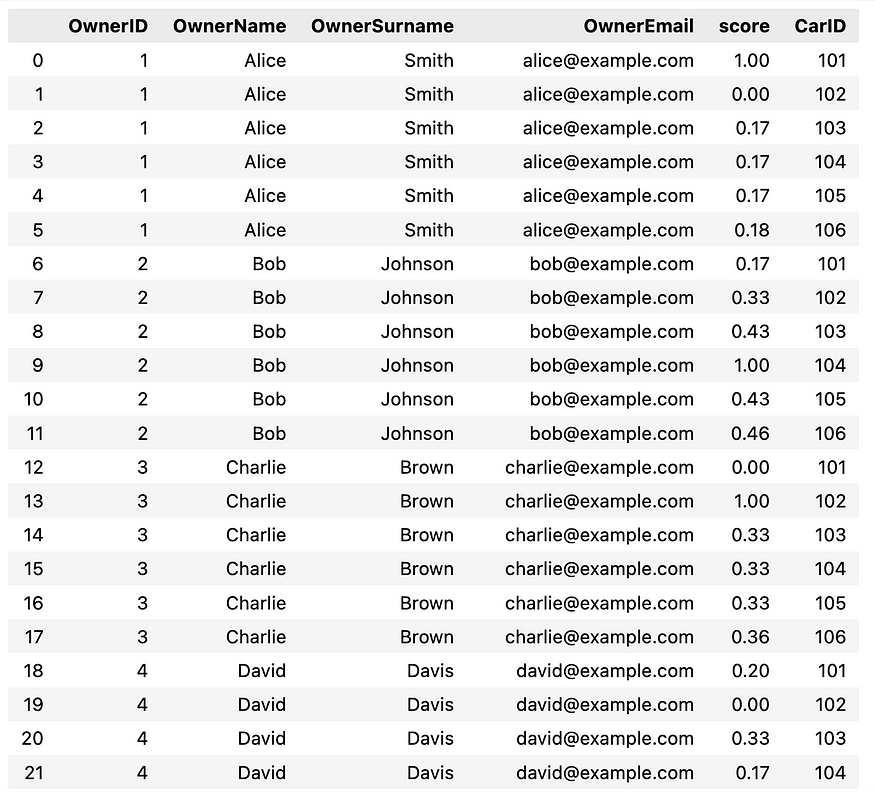
This results in something like below:
Streamlit app
Ok, now let’s create the Streamlit app and the corresponding functionality. Keep your focus on this part because it may take some time to understand it in depth.
dif_pages = list(car_owners_df["OwnerID"].unique())
“dif_pages” is based on the different IDs of the Car Owners. Based on this variable, we will change pages in the app.
Let’s write some callback functions:
def change_position():
 st.session_state.data["position"] = st.session_state.data["position"] + 1

def click_begin_button():
 st.session_state.begin_button = True
So, the “change_position” function will change the “position” in the session state each time. Keep in mind that each time a button or something is triggered, everything is running again. So, we need a session state to keep variable values over reruns.
“click_begin_button”, as can be identified by the name, will be used in the beginning as a callback to the “begin” button in order to initialize the functionality of the app.
Let’s write some streamlit code:
import streamlit as st
import numpy as np
st.title("Dynamic Row Matching App")
if "begin_button" not in st.session_state:
st.session_state.begin_button = False
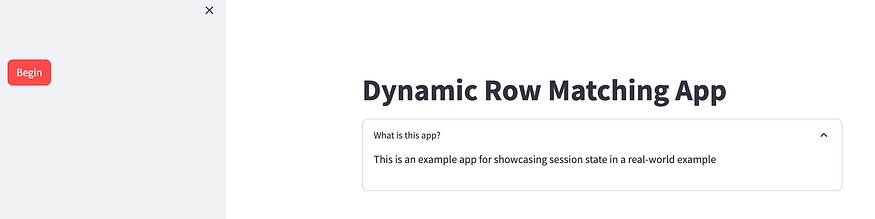
if st.session_state.begin_button == False:
with st.expander("What is this app?", expanded=True):
st.write(
"This is an example app for showcasing session state in a real-world example"
)
st.write("")
Now we want to build the logic of the dataframes that will be visualized after the “begin” button is pressed. We will create two tabs. The first one will be the “Matching” tab, where the user can interact with elements and select the preferred combinations. Then, by pressing the “match” button, two actions will take place. The first one is that the Car Owner will change in the “Matching” tab. Secondly, the validated combination will be appended to a combination dataframe in the “Display” tab.
As can be seen below, we keep both the current position in the session state and the final combination dataframe.
position = 0

if st.session_state.begin_button:
 final_combination_df = pd.DataFrame()

 if "data" not in st.session_state:
 st.session_state.data = {
 "position": position,
 "final_combination": final_combination_df,
 }

begin_button = st.sidebar.button(
 "Begin", key="begin_but", type="primary", on_click=click_begin_button
)
We can see the below interface:
Let’s create some helping functions:
def identify_id(df, id):
 """
 Locates the specific IDs in a dataframe and returns the corresponding dataframe
 """
 return df.loc[df["OwnerID"] == id].reset_index(drop=True)

def create_cars_table(
 final, car_owner_id, cars, threshold_to_keep=0.26, threshold_to_select=0.33
):
 try:
 # Find for the specific merchant the transactions
 car_owner_df = final.loc[final["OwnerID"] == car_owner_id]
 print(car_owner_df)
 # Keep only those above the threshold
 car_owner_df = car_owner_df.loc[car_owner_df["score"] >= threshold_to_keep]

 id_list = car_owner_df["CarID"].to_list() # which are the cars'id to bring
 identified_cars_df = cars.loc[cars["CarID"].isin(id_list)]
 # Get also the scores from merging
 identified_cars_df = (
 identified_cars_df.merge(
 car_owner_df[["CarID", "score"]],
 left_on="CarID",
 right_on="CarID",
 how="left",
 )
 .sort_values(by="score", ascending=False)
 .reset_index(drop=True)
 )

 if len(identified_cars_df) > 0:
 identified_cars_df.insert(0, "selection", False) # new column in front
 # If some transactions are above the threshold, select them
 identified_cars_df["selection"] = np.where(
 identified_cars_df["score"] >= threshold_to_select, True, False
 )
 except Exception:
 identified_cars_df = pd.DataFrame()
 return identified_cars_df
“create_cars_table” is actually a function that builds the combined dataframe of selected cars and owners. We also use as arguments two thresholds. “threshold_to_keep” is the threshold that will indicate which car rows will be shown in the app (above that threshold). “threshold_to_select” is the threshold that will indicate which car rows will be selected by default in the app.
Now, let’s create one more callback for the match button:
def change_position_on_ok():
 # Find and loc the selected cars
 temp_selection_df = edited_car_df.loc[
 edited_car_df["selection"] == True
 ].reset_index(drop=True)
 # Add the current id
 temp_selection_df["Owner_ID"] = current_id
 final_combination_df = pd.concat(
 [st.session_state.data["final_combination"], temp_selection_df],
 ignore_index=True,
 sort=True,
 )
 st.session_state.data["final_combination"] = final_combination_df.drop(
 ["selection"], axis=1
 )
 change_position()
And…. the final parts with the tabs:
if st.session_state.begin_button == True:
 matching, dis_matched = st.tabs(["Matching", "Display matched"])

 with matching:
 if st.session_state.data["position"] < len(dif_pages):
 current_id = dif_pages[st.session_state.data["position"]]
 identified_owner = identify_id(car_owners_df, current_id)
 identified_cars_df = create_cars_table(
 final=final_df,
 car_owner_id=current_id,
 cars=cars_df,
 )

 if not identified_cars_df.empty:
 st.header("Car Owner")
 edited_owner_df = st.data_editor(identified_owner)
 st.header("Cars")
 edited_car_df = st.data_editor(identified_cars_df)

 ok_button = st.button(
 "Match",
 key="ok_button",
 type="primary",
 on_click=change_position_on_ok,
 )

 with dis_matched:
 st.header("Matched Table")
 final_edited_combination_df = st.data_editor(
 st.session_state.data["final_combination"]
 )
 st.session_state.data["final_combination"] = final_edited_combination_df
We use “st.data_editor” to give the user the ability to edit the showcased information if needed.
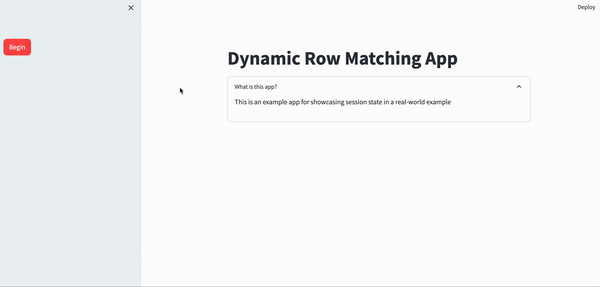
The final app can be seen below:
Conclusion
During the exploration of Streamlit’s functionalities, we have examined the pragmatic uses of session state and observed how this apparently straightforward technology may enable developers to construct exceptional applications with minimal lines of code. Streamlit was once perceived as a tool primarily used for rapid prototyping. However, its adaptability and user-friendly nature have facilitated its integration into the domain of production-grade applications.
In this hands-on example, we can identify the infinite parts and use cases that Streamlit can cover. In the near future, I am thinking of building a package that will encapsulate all the above parts and make it easier for the user to adapt based on their needs. If you have any ideas, please reach out!
If you liked this article, please follow me to be notified of future ones. https://medium.com/@stavrostheocharis
The first part of the “session state” series can be found here.
You can also check out my previous articles, which cover various parts of data science, AI, and software. Some of my streamlit articles are:
- Empowering Your App with Streamlit’s New Connections Feature and Interactive Plotly Maps
- How To Create an End-2-End Text Paraphrase App
Join thousands of data leaders on the AI newsletter. Join over 80,000 subscribers and keep up to date with the latest developments in AI. From research to projects and ideas. If you are building an AI startup, an AI-related product, or a service, we invite you to consider becoming a sponsor.
Published via Towards AI
Related posts
Popular posts

 for 2021")


Updates

Recent Posts